moveLinear
始めにAnimation Engineを開いて、start using stack "animationEngine"
サンプルスタックは、下記をメッセージボックスにコピペしてリターンキーを
go stack \
    url "http://kenjikojima.com/livecode/ae/moveLinear.livecode"


オブジェクトが直線で移動するプロパティを、ターゲットとなるオブジェクトのカスタム・キーに、
「moveLinear」と言う名前で設定します。サンプルでは向きと長さの違う直線を作り出す為に、
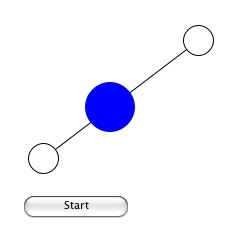
左右にあるグラフィックの白い円をドラッグすることで、直線の向きと長さのが変化できるようになっています。
移動するポイントの、2点のX値Y値を設定すれば、 グラフィックの直線は描く必要はありません。

-- 直線の長さ角度を変化させるスクリプト:カード内
-- 白い Oval のグラフィックは、「 startOval」と「 endOval」と言う名前にします
on mouseMove
 set the points of grc "tLine" to the loc of grc "startOval" &","& the loc of grc "endOval"
end mouseMove


右図のブルーの円が、直線上を移動するターゲットで、名前を「movingBlue」としました。
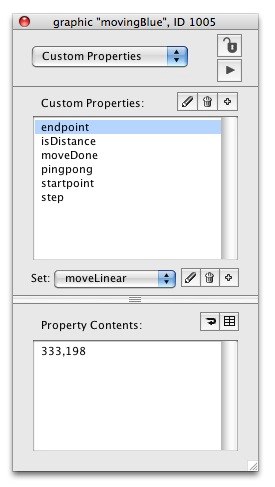
カスタムキー「 moveLinear」にセットするプロパティは、図2にある通り6種類がセットされます。

テストのために、「startpoint」と「endpoint」だけを設定してみます。
-- ブルーの円(グラフィック)を、ロケーション 100,100 と 200,100 の間を行き来させる

set the moveLinear["startpoint"] of grc "movingBlue" to 100,100
set the moveLinear["endpoint"] of grc "movingBlue" to 200,100

これで grc “movingBlue” に、カスタムキーの「 moveLinear」が作られて、
「startpoint」と「endpoint」にそれぞれの座標がセットされます。

次に X軸の100 と200 との間を行き来させるボタン「StopStart」を作って、
そのボタンの「flag」と言うカスタムプロパティが true なら、ブルーの円が移動、
false なら止まるように、ボタン内にスクリプトを書きますが、その前に

-- クリックの度に、カスタムプロパティ「flag」は、「true」と「false」が交互にセットされる、
-- トリガーのスクリプトが必要です。
if the flag of me is empty then set the flag of me to false
set the flag of me to not the flag of me

-- この後、true ならば(= the flag of me) 移動する条件を書いて、hereWeGo と言うハンドラーに渡します。
if the flag of me then hereWeGo
-- もし the flag of me が true でない場合は、 mouseUp を抜けて grc "movingBlue"はストップします。

-- hereWeGo では、the flag of me がtrue である間
-- 「 moveLinear」を 20 ミリセカンド毎に grc "movingBlue" 送り続けます
on hereWeGo
 send moveLinear to grc "movingBlue"
 if the flag of me then send hereWeGo to me in 20 milliseconds
end hereWeGo

「 moveLinear」を grc "movingBlue" 送ると、カスタムキー「 moveLinear」には、
「startpoint」と「endpoint」以外のカスタムプロパティ「isDistance」、
「moveDone」「step」がセットされます。

isDistance は、 「startpoint」からターゲットの移動しているオブジェクトまでのピクセル数
moveDone は、
true であればストップ。そうでない場合は移動中
step は、直線上を移動するオブジェクトのスピード。デフォルトでは 1 。
数値を上げると高速になります

もうひとつセットできるプロパティの「pingpong」は、「true」であれば移動するオブジェクトが折り返されます。

ブルーの円(グラフィック)を、ロケーション 100,100 と 200,100 の間を行き来させる、
ボタンのスクリプトを通しで書いてみます。実際には、ボタンのレイベルが「Stop」と「Start」とに切り替わるスクリプト等
が必要ですが、テスト用にシンプルにしています。

-- button “StartStop”のスクリプト

on mouseUp
 if the flag of me is empty then set the flag of me to false
 	set the flag of me to not the flag of me
 if the flag of me then
 	hereWeGo
 end if
end mouseUp

on hereWeGo
 send moveLinear to grc "movingBlue"
 if the flag of me then send hereWeGo to me in 20 milliseconds
end hereWeGo


これで基本的な動きはわかりましたが、まだ変化する直線上ではオブジェクトが動いていません。

その前に「step」のスピードを 3 に、「pingpong」を true にしておきます。

set the moveLinear["step"] of grc "movingBlue" to 3
set the moveLinear["pinpong"] of grc "movingBlue" to true


-- カード内に書き込むスクリプト 1
on mouseMove

-- 直線を変化させるスクリプト

-- 上記テストでは固定した数値でしたが、直線が変更されるにしたがって、スタートとエンドが書き替えられます
 set the points of grc "tLine" to the loc of grc "startOval" &","& the loc of grc "endOval"


 -- 移動するターゲットオブジェクト内に、カスタムキー「moveLinear」の「startpoint」と「endpoint」がセットされる
 set the moveLinear["startpoint"] of grc "movingBlue" to  \
 	the loc of grc "startOval"
 set the moveLinear["endPoint"] of grc "movingBlue" to the loc of grc "endOval"
end mouseMove


-- カード内に書き込むスクリプト 2

-- カード上にあるオブジェクトが共通に使えるコマンド。

-- このサンプルでは、button “StartStop”, grc “startOval”, grc “endOval”で使っています

-- 上のベーシックテストで、 ボタン “StartStop”に書き込んだのと、ほとんど同じです
command hereWeGo
 send moveLinear to grc "movingBlue"

 -- 各オブジェクトに共通に使えるよう、 ボタン“StartStop” では me としていたのを「the target」にしています
 if the flag of the target then send hereWeGo to the target in 20 milliseconds
end hereWeGo


-- ボタン「startEnd」に書き込むスクリプト
on mouseUp
 -- the flag of me のプロパティを true と false に交互に切り替える
 if the flag of me is empty then set the flag of me to false
 set the flag of me to not the flag of me
 if the flag of me then

 	-- the flag of me が true ならば、コマンド hereWeGo に渡す
	 hereWeGo
 -- ボタンのレイベルを「Stop」にする
	 set the label of me to "Stop"
 else

 	-- false の場合、オブジェクトの移動はストップされるので
 -- ボタンのレイベルを「Start」にする
	 set the label of me to "Start"
 end if
end mouseUp


-- グラフィック「startOval」と「endOval」に、共通に書き込むスクリプト

on mouseDown
 set the flag of me to true
 hereWeGo
 grab me
end mouseDown

on mouseUp
 set the flag of me to false
end mouseUp

