LiveCode ノート
使っているプログラム言語はLiveCodeです。基本的な扱いはわかっているものとして書き進みます。
LiveCodeのフリー版「Community」はここからダウンロードできます。LiveCode 9.6(2021年2月)macOSで開発しています。
画像を読む 02
画像データを macOSのスピーチ機能で読むプログラムを書いています。macOSのスピーチ機能の読み手の名前以外は、WindowsでもLiveCodeで開発できると思います。前ページでも書いたように、途中まで作りかけていたので、開発の大体の方向はありますが、最終的な形を現在考えている訳ではありません。私の制作ノートと思って読んでください。
モザイク
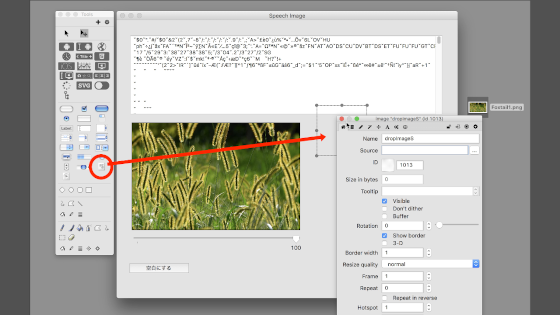
ここでは画像をモザイクにします。前ページに書いた、テキストのドラッグ&ドロップは使用しません。フィールドはイメージ・データを表示しますから、フィールド名を「tImageData」として、左右はほぼウインドウ・サイズに。画像は16:9の比率の写真を使うと固定させて「400x255」のサイズにしました。フィールド「tImageData」とイメージ「dropImage」の位置を変え、ロケーションをロックします。
カードに書くハンドラー「dragDrop」のスクリプトを修正します。まずフィールドにテキストをドロップしないので、その条件文を削除します。次に「png画像」と「jpg画像」の条件文を一つにまとめました。
-- カードに書くスクリプト
on dragEnter set the acceptDrop to true end dragEnterここは前回と同じ
-- その下に書くスクリプト
on dragDrop
   put dragData["files"] into tPath
   -- 「.pngの条件」と「.jpgの条件」をカッコでくくって、「or」でつないでまとめる
   if (word 1 of the target is "image" and char -4 to -1 of tPath is ".png") or \
         ( word 1 of the target is "image" and char -4 to -1 of tPath is ".jpg") then
      -- ドロップしたイメージをイメージ・オブジェクトにセットするコマンドは同じ
      setImage tPath
   else
   -- 上の条件以外は全てビープを鳴らしてスクリプトから抜ける
      beep
      exit to top
   end if
end dragDrop

private command setImage pPath
   set the filename of the target to ("file://"& pPath)
/* 以下16:9の比率の写真を使用するので必要ありません
   set the width of image "dropImage" to the width of this cd / 2
   set the height of image "dropImage" to \
         (the formattedheight of image "dropImage" * the width of this cd / 2) \
         / the formattedwidth of image "dropImage"
*/
end setImage
ここまでは前回のスクリプトを少し整理した程度ですが、モザイクにするにはイメージ・オブジェクトにセットしたイメージ・データを、バイナリー・データで扱います。コマンド「setImage」でセットした画像のオリジナルのデータを、後々使用することになるので、それをカスタム・プロパティとしてイメージ・オブジェクト「dropImage」に収納しておきます。これは画像のデータを変形しなくてはならなかったりした時に、オリジナルのデータに戻る際など非常に便利です。
コマンド「setImage」の最後に
set the tOriginalData of image "dropImage" to the imageData of image "dropImage"このスクリプトを書き込みます。イメージをセットされたイメージ・オブジェクト「dropImage」に「tOriginalData」という名前のカスタム・プロパティをセットしました。カスタム・プロパティには必ず「the 」を付けます。ついでにオリジナルのイメージ・データがどんなものか、上にあるテキスト・フィールド「tImageData」 に入れます。 書き直したコマンド「setImage」は、以下になります。
private command setImage pPath
   set the filename of the target to ("file://"& pPath)
   -- カスタム・プロパティ「the tOriginalData」にイメージ・データを収納
   set the tOriginalData of image "dropImage" to the imageData of image "dropImage"
   -- イメージ・データのバイナリをファールドに入れる
   put the tOriginalData of image "dropImage" into fld "tImageData"
end setImage
オリジナルのイメージ・データはバイナリなのですが、人間に扱いやすいよう各バイナリごとに、ASCII(アスキー)コードというヨーロッパ言語の文字、数字、記号に変換してあります。画像をイメージ・オブジェクト「dropImage」にドロップすると、フィールド「tImageData」にバイナリが表示されるようにしました。普通では読めないです。
さてこのバイナリ・データを使って、オリジナル画像のモザイクを作ります。モザイクを作るのは、オリジナル画像のデータが膨大なので、データの量を減らすのが目的です。一旦このバイナリの文字数を数えてみます。メッセージ・ボックスを開いて下のスクリプトを入れて、リターンします。
put the num of chars of fld "tImageData"私の場合「369360」が返されました。つまり使用している写真には、36万9千360の文字数のバイナリがあります。
イメージをモザイクにするには、たぶんいろいろな方法があると思いますが、LiveCodeのイメージの性質を利用して、別なイメージ・オブジェクトにデータを移して縮小するトリックを使います。そのためのイメージ・オブジェクトをツール・パレットから作り、名前を「dropImageS」としました。

縮小の比率を指示するスクロール・バーを、オリジナル・イメージの下に作ります。つまりスクロール・バーに現れた数値をパーセントとしてイメージを縮小「dropImageS」して「dropImageS」のイメージ・データを、縮小したイメージ「dropImage」に移して、サイズはオリジナルに戻す手法をとります。数値を2パーセントにするとイメージ「dropImageS」は8x5ピクセルになるので、モザイクは横8、縦5のモザイクになります。50パーセント以上では、はっきりとわかるモザイクには見えません。
以下のスクリプトは、スクロール・バーに書き込みます。
on mouseUp
-- 過程をロックしておくと経過表示をしないので早くなります(ほとんど目には見えない程度ですが)
   lock screen
   -- 元のイメージ「dropImage」のレクト(rectangle)を記録しておく
   put the rect of image "dropImage" into tRectImage

   -- 「dropImage」の横・縦を「tWidth」「tHeight」に収納
   put the width of image "dropImage" into tWidth
   put the height of image "dropImage" into tHeight

   --「dropImageS」を「dropImage」と同じ大きさに(あとで違う表記にします)
   set the width of image "dropImageS" to tWidth
   set the height of image "dropImageS" to tHeight

   -- オリジナルのイメージ・データを「dropImageS」にセット
   set the imagedata of image "dropImageS" to the tOriginalData of image "dropImage"

   -- イメージ「dropImageS」をパーセントで縮小
   put  (the thumbpos of sb "sbBar" / 100) into tPercent
   set the width of image "dropImageS" to tWidth * tPercent
   set the height of image "dropImageS" to tHeight * tPercent

   -- イメージ「dropImage」をイメージ「dropImagS」のサイズに
   set the width of image "dropImage" to the width of image "dropImageS"
   set the height of image "dropImage" to the height of image "dropImageS"

   -- イメージ「dropImageS」のイメージ・データをイメージ「dropImage」に
   set the imagedata of image "dropImage" to the imagedata of image "dropImageS"

   -- イメージ「dropImage」を元のサイズ、ロケーションに
   set the rect of image "dropImage" to tRectImage
end mouseUp
これでスクロール・バーを動かすと、イメージ「dropImageS」の変化を見ながらモザイクの様子がわかりますが、実際のプロジェクトではイメージ「dropImageS」を見えないようにします。現在イメージ・オブジェクト「dropImageS」はレイヤーのトップにありますから、レイヤーのボトムにしてイメージ・オブジェクト「dropImage」の影に隠れるようにします。
-- レイヤーのボトムに移動させるスクリプトをメッセージ・ボックスから送ります
set the layer of image "dropImageS" to bottom
スクロール・バーのスクリプトの最後に、イメージ・オブジェクト「dropImageS」をイメージ・オブジェクト「dropImage」の下に隠れる行を加えます。
-- イメージ「dropImageS」をイメージ「dropImage」のロケーション(中心位置)に
set the loc of image "dropImageS" to the loc of image "dropImage"
スクロール・バーのスクリプトをまとめて書き直します。
on mouseUp
   lock screen
   put the rect of image "dropImage" into tRectImage
   put the width of image "dropImage" into tWidth
   put the height of image "dropImage" into tHeight
   set the rect of image "dropImageS" to tRectImage
   set the imagedata of image "dropImageS" to the tOriginalData of image "dropImage"
   put  (the thumbpos of sb "sbBar" / 100) into tPercent
   set the width of image "dropImageS" to tWidth * tPercent
   set the height of image "dropImageS" to tHeight * tPercent
   set the width of image "dropImage" to the width of image "dropImageS"
   set the height of image "dropImage" to the height of image "dropImageS"
   set the imagedata of image "dropImage" to the imagedata of image "dropImageS"
   set the rect of image "dropImage" to tRectImage
   set the loc of image "dropImageS" to the loc of image "dropImage"
end mouseUp
ドラッグ&ドロップ
スピーチ
アーチスト:小島健治 / Artist: Kenji Kojima
アーチスト:小島健治
kenjikojima.com

クリエイティブ・コモンズ
Attribution-NonCommercial-NoDerivatives
日本からのドネーションは こちらをクリック
LiveCode 6 初心者開発入門
kenjikojima.com

クリエイティブ・コモンズ
Attribution-NonCommercial-NoDerivatives
日本からのドネーションは こちらをクリック
LiveCode 6 初心者開発入門