LiveCode ノート
使っているプログラム言語はLiveCodeです。基本的な扱いはわかっているものとして書き進みます。
LiveCodeのフリー版「Community」はここからダウンロードできます。LiveCode 9.6(2021年2月)macOSで開発しています。
画像を読む 04
画像データを macOSのスピーチ機能で読むプログラムを書いています。前ページでも書いたように、開発の大体の方向はありますが、最終的な形を現在考えている訳ではありません。制作ノートと思って読んでください。
モザイクのデータ
これからどう言う扱いになるのかわからないのだけれど、異なるモザイクにした時のバイナリを、それぞれテキスト・フィールドに入れてゆくことにします。
スクロール・バー「sbBar」の「mouseUp」ハンドラーの最後の行に書き込む
-- イメージ「dropImageS」のイメージ・データをフィールドに入れる
   put the imageData of image "dropImageS" into fld "tImageData"

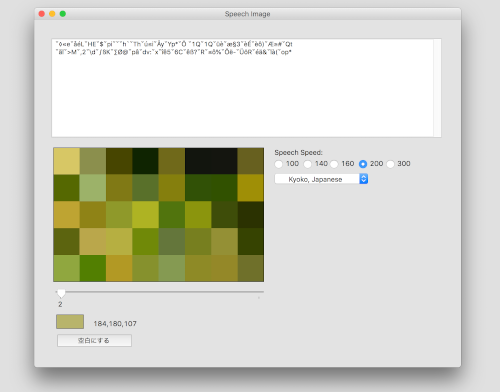
スクロール・バー「sbBar」の「mouseUp」ハンドラーの最後に書き込んで、パーセントを「2」にした時のスクリーン・ショットです。モザイクはこの私の場合「8x5=40」です。トータル40カラーのひとつひとつのカラーが4つのバイナリー・データで構成されるので、合計「40x4=160」のバイナリーがフィールドに入っていなければいけません(つまりASCIIの文字数が160)。一応確認のスクリプトをメッセージ・ボックスから送ってみます。
メッセージ・ボックスから送る
   put the num of chars of fld "tImageData"
   -- 160 が返されました
後からの説明になりましたが、一つのピクセルは4つのバイナリー・データで構成されています。始めが画像の透明度のアルファ、次にRGB(Red, Green, Blue)と続く数値です。つまり4つが一つの単位と考えます。
スクロール・バー「sbBar」を動かして、フィールド「tImageData」に入れたバイナリを0から255までの10進数に変換します。上に書いたように一つのピクセルは、4つのバイナリで構成されています。ひとつ目のバイナリは透明度のアルファなので、残りのRGB値だけの数値にします。後から扱いやすいようにモザイク数の横に行替え(return = cr)を入れて、表(配列)にしておきます。
右上にバイナリを10進数に変換する新ボタン「binaryToDigimal」を作りました。スクロール・バーのパーセントから作ったモザイク・カラーのバイナリーを、10進数に変換します。ただしピクセルを構成している初めのアルファは除外して、RGB値だけにします。
on mouseUp
   -- 「dropImageS」のイメージ・データ(バイナリ)を「tBinary」に収納
   put the imagedata of image "dropImageS" of stack "speechImage" into tBinary

   -- バイナリの総文字数
   put the length of tBinary into tLength

   -- モザイクの左右天地 = イメージ「dropImageS」のサイズ
   put the width of image "dropImageS" of stack "speechImage" into tWidthS
   put the height of image "dropImageS" of stack "speechImage" into tHeightS

   -- カウンターに始めは0(ゼロ)を入れる
   put 0 into tCount

   -- 4文字ごと(ステップして)リピートする。 バイナリ総数から最後の4文字を引いた数まで
   repeat with i = 1 to (tLength - 4) step 4
      -- リピートするごとに1を加える
      add 1 to tCount
      if tCount = tWidthS then  -- tWidthSはモザイクの左右数
         put cr into tConj -- カウンターがモザイクの左右数になったら行替え(cr)を
         put 0 into tCount -- カウンターを0に戻す
      else
         put tab into tConj  -- 上の条件以外は「tab(タブ)」で区切る
      end if

       -- 始めのcharator i はアルファなので除外。カンマの後にスペースを入れる
       put charToNum(char (i + 1)  of tBinary) & comma & space & \
            charToNum(char (i + 2) of tBinary) & comma & space &\
            charToNum(char (i + 3) of tBinary)  & space &\
            	tConj after tMosaicColor
   end repeat
   put tMosaicColor into fld "tImageData"  -- 10進数RGB値

   set the backgroundColor of grc "testColor" \
   		to the backgroundColor of this cd
end mouseUp
次にこの10進数のRGB値を、読み上げるスクリプトを書きます。
on mouseUp
   -- フィールドにある10進数のRGB値を「mosaicRGB」に収納
   put fld "tImageData" into mosaicRGB

   -- 「mosaicRGB」のアイテム1が数字出なかったらビープを鳴らしてハンドラーを抜ける
   if isNumber (item 1 of mosaicRGB) is false then
      beep
      exit to top
   end if

   -- rowで分割して「mosaicRGB」の配列にする
   split mosaicRGB by row

   -- 「mosaicRGB」の「the keys」がいくつあるか「tVNum(縦何行?)」
   put the num of lines of (the keys of mosaicRGB) into tVNum

   -- itemDelをタブにして配列「 mosaicRGB[1]」の横は何アイテムか
   set itemDel to tab
   put the num of items of mosaicRGB[1] into tHNum

   -- 縦をtVNum回繰り返す
   repeat with i=1 to tVNum
   	  -- 横をtHnum回繰り返す
      repeat with j=1 to tHnum

         -- 繰り返している途中にマウスクリックがあったら終わらせる
         if the mouseClick then
            set the backgroundColor of grc "testColor" \
                  to the backgroundColor of this cd
            put "" into fld "tRGB"
            exit to top
         end if

         -- 横列「mosaicRGB[i]」のアイテムjをtRGBに入れて
         put item j of mosaicRGB[i] into tRGB

         set the backgroundColor of grc "testColor" to tRGB
         put tRGB into fld "tRGB"

         -- tRGB を読み上げる。
         --「readText」はスタック「speechImage」に書いたコマンド
         readText tRGB
         wait 260
      end repeat
   end repeat

   -- 全て終わったらカラーをカードの色にして、RGB値のフィールドをカラに
   set the backgroundColor of grc "testColor" \
         to the backgroundColor of this cd
   put "" into fld "tRGB"
end mouseUp
スピーチ
カラーネーム
アーチスト:小島健治 / Artist: Kenji Kojima
アーチスト:小島健治
kenjikojima.com

クリエイティブ・コモンズ
Attribution-NonCommercial-NoDerivatives
日本からのドネーションは こちらをクリック
LiveCode 6 初心者開発入門
kenjikojima.com

クリエイティブ・コモンズ
Attribution-NonCommercial-NoDerivatives
日本からのドネーションは こちらをクリック
LiveCode 6 初心者開発入門