統合開発環境:LiveCode 6プログラミング 初心者開発入門
無料オープンソース版「LiveCode Community Edition」の初級から中級のチュートリアルです。
このチュートリアルは、中学・高校生からプログラミングが始めての方達を対象にして、Mac&Winのアプリを同時に作ります。
19: サンプル・スタックから、次のステップに進む
この章の概略- ここから先に進むための参考になるサンプル・スタック
- スライドショーのサンプル・スタックと、日本語のコメントをスクリプトに書き込むプラグイン「jpComments」
これで第一部「ほとんど英語テキストでの開発」は最終章です。LiveCodeの開発で押さえておくべき事柄は一通り書いたので、次のステップに進むには、開発しようと思ったり、興味のある分野のサンプル・スタックを見る事が大事です。メニューには「User Samples」「Tutorials」「Resources」と3種類に分類したサンプル・スタックがあります。たぶん英語を読むのはメンドウと言う人も多いでしょう。英語の解説部分はハショっても、サンプル・スタックだけ直接動きを見ながらスクリプトを読んでも、内容はかなり分かるし、それはそれで楽しいです。
もう一カ所良質のサンプル・スタックがダウンロードできる所を書いておきます。
Tactile Media: http://www.tactilemedia.com/
http://www.tactilemedia.com/site_files/software/tutorials.html
日本語を使う開発に興味のある方は、次の第二部「日本語テキストを使う開発」を読んでください。LiveCode(RunRev)は日本語ができないと言うウワサが、誇大に広まっているようですが、何度か書いているように、オペレーション・システムでのファイルパスと、スクリプト・エディターに日本語コメントが書けないと言う問題以外は、たぶんほとんどLiveCodeの日本語の使い方を知らないで、言っているのではと思っています。日本語コメントについては、このチュートリアルのために作った、プラグインを使う簡易的な方法をこの章で書きます。
スライドショー サンプル・スタック
このスライドショー・スタックは、ニューヨークに住んでいる私の友人が、去年東京の某大学で、開拓時代から現代までのアメリカ美術史の、ゲスト講師に招かれて講義すると言う時に、相談を受けて作ったものです。彼は15年程前まで、日本でアメリカ美術の講座を持っていましたが、現在70代後半、コンピューターを使ったプレゼンテーションの経験もなく、とにかくクリックだけですべてできるように作ったものに、スクリプトに日本語コメントを付けて少し手を加えました。アシストしてくれる人に、事前にインターネットで送っておいたので、特に問題もなく講座は無事に終わったそうです。
注:LiveCode 6.5以降で開くとエラーウインドウが出ます。
サンプル ダウンロード: slideshow.zip
http://kenjikojima.com/livecode/download/slideshow.zip
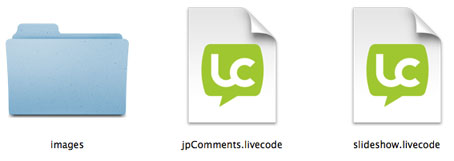
「slideshow.zip」を拡大すると、下の図のように「imagesフォルダー」「jpComments.livecode」「slideshow.livecode」が入っています。「imagesフォルダー」にはサンプルのJPEGファイルが5点と、イメージそれぞれに付ける日本語の説明が5行ある「text.txt」が入っています。サンプルに付けたJPEGはすべて同じサイズですが、どんな比率の写真でもOKです。日本語の説明は必要がなければ、空白にします。日本語原稿はユニコードのUTF8で保存しています。
「slideshow.livecode」が本体のスタックです。
注:LiveCode 7用に修正した「スライドショー」スタック
LiveCode 7 サンプル ダウンロード: slideshow-LC7.zip
http://kenjikojima.com/livecode/download/slideshow-LC7.zip
日本語コメントを書くプラグイン
注:LiveCode 7以降は日本語をスクリプト・エディターに書き込めるので必要ありません。
「jpComments.livecode」はこのチュートリアルのために作った、日本語のコメントをスクリプト・エディターに書き込んで、またそれを読むプラグインです。日本語のコメントを書き込むと言いましたが、実際は日本語を「base64」と言う文字コードに変換して、LiveCodeのスクリプト・エディターにコピー&ペーストします。それをもう一度プラグインの「jpComments.livecode」で読み込んで、プラグインのフィールドに日本語で表示します。私は今まで英語でコメントを書き込んで来たので、特に必要ではありませんが、日本で少しでもLiveCodeが使いやすいように、どうしても日本語でコメントを書き込みたい人のために作ってみました。オープン・ソースですから、だれか低レベルの言語でLiveCode本体の改善をしてくれれば一番良いですが、それまでの簡易的な日本語化です。
LiveCodeのソースはここからダウンロードできます。
https://github.com/runrev
それとユニコード(日本語)は扱いさえ分かっていれば、これくらいの事はできると言う事と、開発ツールはLiveCodeの言葉で自作できるデモでもあります。
スライドショーはフルスクリーンなので、スタックを開くとLiveCodeの開発ツールもメニューも見えなくなります。まず始めに「jpComments.livecode」から開いてください。常時使うようでしたら、プラグイン・フォルダーにインストールするのが良いです。今は「Fileメニュー」からオープンします。
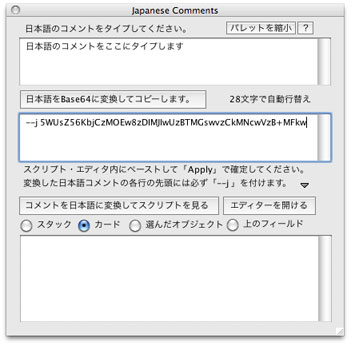
トップにあるフィールドに日本語のコメントをタイプして、その下「日本語をBase64に変換してコピーします。」をクリックすると、その下のフィールドに始めに「--j 」の付いた英数字が表れて、その時点で変換されたその文字列がクリップボードにコピーされます。左右は自動で28文字に行替えされます。行が変わった始めには必ず「--j 」が付いています。開発中のスタックのスクリプト・エディターに変換されたその文字列をペーストしたら、スクリプトを確定させるスクリプト・エディター左上の「Apply」をクリックするか、MacOSなら「コマンド・キー + リターン・キー」。Windowsは「コントロール・キー + リターン・キー」を叩いてください。確定させないと「コメントを日本語に変換してスクリプトを見る」は正しく働きません。長いスクリプトをプラグインのテキスト・フィールドで見るのが大変な時は、スクリプト・エディターから「--j 」のラインだけをコピーして、プラグインの2番目のフィールドにペーストしたら、ラジオ・ボタン「上のフィールド」を選んで「コメントを日本語に変換してスクリプトを見る」をクリックします。
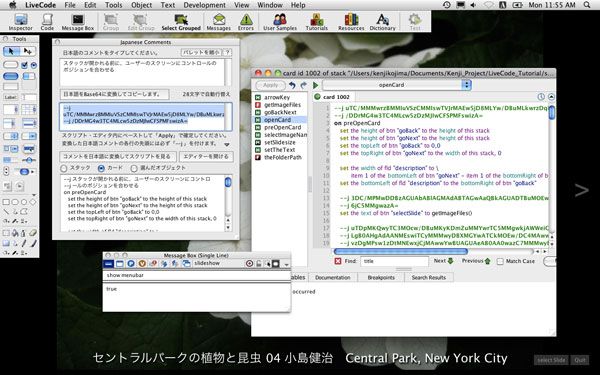
「slideshow.livecode」を開く前に、メッセージ・ボックスを開いてください。スタックを開いたら
show menubar

hide this stack
どちらか一行をメッセージ・ボックスから送ります。Windowsでは「hide this stack」だけが有効です。サンプル・スタックなので、特に編集の必要はないのですが念のため。「slideshow.livecode」を開くと、スクリーン全面にスタックが開かれます。下の図はメニューやスクリプト・エディターも開いています。スクリプト・エディターは「jpComments」からも開けるようにしています。
「jpComments」の下半分で、最上部にあるスタックのスクリプトを、Base64から日本語に変換して見る事ができます。
hide menubar

show this stack
で、フルスクリーンのスタックに戻す事ができます。
スライドショー・スタックのスクリプト全文
LiveCode7 注:エラーを修正した「slideshow-LC7.livecode」のスクリプトを見てください。
ここに書いてあるのはLiveCode 6で動くスクリプトです。
以下に日本語のコメントを付けたスクリプトを書きます。左右の字詰めの関係で、実際のスクリプトとは違う行替えの箇所があります。
--------------------- 「slideshow」スタック内のスクリプトここから -------------------
--// this stack was programmed by Kenji Kojima, index@kenjikojima.com //----

--j スタンドアロンにする前に必要な事柄を初期化します
command setStandalone
   set the filename of image "slide" to empty
   put empty into fld "description"
   set the cText of image "slide" to empty
end setStandalone
--------------------- 「slideshow」スタック内のスクリプト終わり -------------------
スタンドアロンにするプロジェクトには、だいたいいつもコマンド「setStandalone」を作っておきます。フィールド内の文字や、ラジオ・ボタンのセットなどの初期化をするために、スタンドアロンのテストの前にメッセージ・ボックスから送ります。これは私のやり方ですから、また別な方法もあるでしょう。
--------------------- 「slideshow」カード内のスクリプトここから -------------------
--j スタックを開く前に、メニューバーを隠して、フルスクリー
--j ン、黒のバックグラウンドに。フルスクリーンにコントロー
--j ルのポジションを合わせる
on preOpenStack
   hide menubar
   set the fullscreen of stack "slideshow" to  true
   set the backgroundColor of this stack to 0,0,0
   set the height of btn "goBack" to the height of this stack
   set the height of btn "goNext" to the height of this stack
   set the topLeft of btn "goBack" to 0,0
   set the topRight of btn "goNext" to the width of this stack, 0
   set the width of fld "description" to the width of this stack
   set the bottomLeft of fld "description" to \
   	the bottomLeft of  btn "goBack"
   set the bottomRight of grp "SelectQuit" to \
    item 1 of the bottomRight of this stack - 6, \
    item 2 of the bottomRight of this stack - 8

--j ボタン「selectSlide」のメニューをイメージの
--j リストに
   set the text of btn "selectSlide" to getImageFiles()

--j スライドショーの説明のテキストを外部ファイル「text
--j .txt」からゲットして、イメージ「slide」のカス
--j タム・プロパティ「cText」にセットする
   get url ("binfile:text.txt")
   if it <> empty then
      set the cText of image "slide" to it
   else
      set the cText of image "slide" to empty
   end if

   showFirstImage
end preOpenStack


private command showFirstImage
   put line 1 of getImageFiles() into tSlideName
   setTheText 1
   set the filename of image "slide" to tSlideName
   setSlidesize
end showFirstImage


--j Macの開発環境とスタンドアロンの「filename」
--j の違いを修正するファンクション
private function theFolderPath
   if the environment is "development" then
      set the itemDel to "/"
      return item 1 to -2 of the filename of this stack
   else
      put the fileName of this stack into tPath
      set the itemDel to "/"
      switch the platform
         case "MacOS"
            put item 1 to -5 of tPath into tResult
            break
         case "Win32"
            put item 1 to -2 of tPath into tResult
            break
      end switch
      return tResult
   end if
end theFolderPath


function getImageFiles
   put theFolderPath() & "/images" into tFolder
   set the defaultFolder to tFolder
   put the files into tFiles

--j フォルダー「images」内のJPEGファイル以外をフ
--j ィルターで取り除く
   filter tFiles with "*.jpg"
   return tFiles
end getImageFiles

--j 矢印キーが叩かれた時にスライドを変える
on arrowKey tKey
   if tKey is "right" then
      send mouseUp to btn "goNext"
   else
      if tKey is "left" then
         send mouseUp to btn "goBack"
      end if
   end if
end arrowKey


--j スライド説明の文(日本語、英語)をフィールド「desc
--j ription」にセットする
command setTheText pLineNum
   if the cText of image "slide" is not empty then
      set the unicodeText of fld "description" to \
        uniencode(line pLineNum of the cText of image "slide", utf8)
   end if
end setTheText


--j 左右に配置した「goNext」「goBack」
command goBackNext
   put the filename of image "slide" into slideName
--j イメージのファイルネームから、説明テキストの何行目かを
--j 「tImageNum」に入れる
   put lineOffset(slideName, the text of btn "selectSlide") \
     into tImageNum

   if word 2 of the target is quote& "goNext" "e then
      if tImageNum >= the num of lines of getImageFiles() then
--j 始めに戻る
         put line 1 of getImageFiles() into tSlideName
         setTheText 1  --//fld "description" //---
      else
         put line tImageNum +1 of getImageFiles() into tSlideName
         setTheText tImageNum +1  --//fld "description" //---
      end if
   else
      if tImageNum is 1 then
--j 現在始めのイメージを見せているので、goBackで最後
--j のイメージにする
         put line -1 of getImageFiles() into tSlideName
         setTheText the num of lines of the cText of image "slide"
           --//fld "description" //---
      else
         put line tImageNum -1 of getImageFiles() into tSlideName
         setTheText tImageNum -1  --//fld "description" //---
      end if
   end if
   set the filename of image "slide" to tSlideName
   setSlidesize
end goBackNext


--j イメージをセットして、説明文をフィールド「descri
--j ption」にセット
command selectImageName pItemName
   set the filename of image "slide" to pItemName
   put lineOffset(pItemName, getImageFiles() ) into tLineNum
   set the unicodeText of fld "description" to \
      uniencode(line tLineNum of the cText of image "slide", utf8)
   setSlidesize
end selectImageName


--j イメージを左右又は天地の最大サイズにセット
private command setSlidesize
   put the formattedwidth of image "slide" into tFormatWidth
   put the formattedHeight of image "slide" into tFormatHeight
   put the width of this stack into tStackWidth
   put the height of this stack into tStackHeight
   if tFormatHeight >= tFormatWidth then
      set the height of image "slide" to tStackHeight
      set the width of image "slide" to tFormatWidth * \
        tStackHeight div tFormatHeight
   else
      put tStackWidth - 2 * the width of btn "goNext" into tSlideWidth
      set the width of image "slide" to  tSlideWidth
      set the height of image "slide" to tFormatHeight * \
        tSlideWidth div tFormatWidth
   end if
   set the loc of image "slide" to the loc of this stack
end setSlidesize
--------------------- 「slideshow」カード内のスクリプト終わり -------------------
---------------------「slideshow」ボタン「goNext」スクリプトここから -----------------
on mouseUp
   goBackNext
end mouseUp
--------------------- 「slideshow」ボタン「goNext」スクリプト終わり -------------------
---------------------「slideshow」ボタン「goBack」スクリプトここから-------------------
on mouseUp
   goBackNext
end mouseUp
--------------------- 「slideshow」ボタン「goBack」スクリプト終わり -------------------
--------------------「slideshow」ボタン「selectSlide」スクリプトここから -----------------
on menuPick pItemName
   selectImagename pItemName
end menuPick
---------------------「slideshow」ボタン「selectSlide」スクリプト終わり ------------------
--------------------「slideshow」ボタン「Quit」スクリプトここから -----------------
on mouseUp
   quit
end mouseUp
---------------------「slideshow」ボタン「Quit」スクリプト終わり ------------------
3D ワイヤーフレーム ドローイング
最後にアニメーション・エンジンを使ったスタックを紹介します。私のプロジェクトの「RGB MusicLab」と言うアプリケーションのサブスタックの1つです。始めにアニメーション・エンジンを開いておかないと、エラーになります。アニメーション・エンジンは「13章:マルチメディア1」で説明しています。まだ持っていなかったら、ダウンロードはこのアドレスからできます。サイトに行ってアニメーション・エンジンのライセンスを読んで、「animationEngine5.0.2.zip」をダウンロードしてください。
アニメーション・エンジンを開いたら、「Use me!」をチェックにします。それからメッセージ・ボックスで
go stack url "http://kenjikojima.com/livecode/download/draw3D.livecode"
を、送ってください。